- Home
- Games
- Games Features
- How to Record Game Videos on Windows 10
How to Record Game Videos on Windows 10
By NDTV Correspondent | Updated: 1 September 2015 19:20 IST

Click Here to Add Gadgets360 As A Trusted Source

Advertisement
Ever wanted to share a video of amazing moments from games that you're playing? Maybe there was that perfectly timed shootout in a Call of Duty session, or perhaps you're still excited by a brilliant run and goal in FIFA. The PS4 and Xbox One allow you to record gameplay footage with the press of a button, but until now, PC gamers had to use third party tools to get this done, with services like Steam, Fraps, or the GeForce Experience. Windows 10 finally lets you record your game footage in a simpler fashion, via the Xbox app that comes bundled with the OS.
Using the built-in Game DVR feature on Windows 10 is extremely simple, and also compatible with the Xbox One controller, so it's one of the better options if you want to share your game footage.
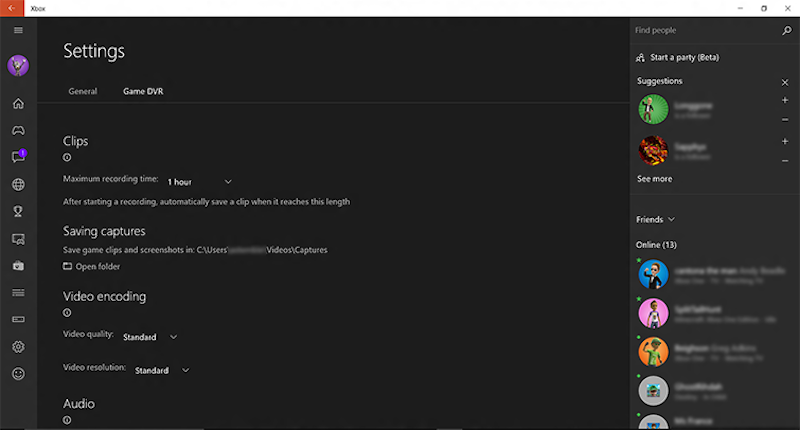
First you have to check if Game DVR is enabled. Go to the Xbox One app on your Windows 10 PC, choose on Settings and then select the Game DVR tab.
Here, the first option is to turn the Game DVR functionality on or off. If it is switched off then click on the toggle to switch it on.
You can also change what gets recorded. By default, hitting the Record that button saves the last 30 seconds of gameplay into a game clip. You can change this in the settings.
While you're playing a game, press the Windows key + G (or the Xbox button if you're using a controller) to open the Game bar.
Click the Record that button.
If you want to take longer videos, click the Record button instead. It puts videos in the 'File Explorer\Videos\Captures' folder by default. Each video is identified with the game's title. When recording starts, a timer shows you how long you've been recording. By default the maximum recording time is one hour. This can be changed in the settings.
To stop recording, bring up the Game bar again and press the red stop button.
The first time you use the Game bar with a game, you'll be prompted to identify the program as a game before the Game bar will appear. Click the checkbox that appears to confirm the program is a game. That's all there is to it, the Game DVR function is a super simple way to save your gaming glory in a pinch. The fact that it works across PC game clients just makes it one of the more convenient Windows 10 features.
Comments
Get your daily dose of tech news, reviews, and insights, in under 80 characters on Gadgets 360 Turbo. Connect with fellow tech lovers on our Forum. Follow us on X, Facebook, WhatsApp, Threads and Google News for instant updates. Catch all the action on our YouTube channel.
Advertisement
Follow Us
-

19:39
LIVE: Xiaomi 17T & Xiaomi TV FX Mini LED Series Launch | Get Closer to Every Detail -
04:26
Moto Buds 2 Review: Best TWS Under Rs. 3000? -
03:26
How To Apply For Driving Licence Online From Home? | Step-by-Step Guide 2026 -
05:58
Motorola Edge 70 Pro Review | Full Specs, Performance & Battery Test -
07:07
Moto g37 Power Review: Best Phone To Buy Under 25,000?
-
7500 रुपये सस्ता मिल रहा 200 मेगापिक्सल कैमरा वाला Vivo स्मार्टफोन
-
WWDC 2026: iOS 27 से लेकर नए Siri AI के साथ Apple की ये 10 बड़ी घोषणाएं
-
Ultraviolette का धांसू ऑफर, नई बाइक खरीदने पर मिलेगा 30 हजार रुपये कैशबैक
-
Redmi K100 में मिल सकती है 8,000mAh की बैटरी, Snapdragon 8 Elite Gen 5 चिपसेट
-
जेब में लेकर घूमिए मिनी AC! 18°C तक कूलिंग देगा यह डिवाइस, कीमत ₹2 हजार से कम
Advertisement
Popular on Gadgets
- Samsung Galaxy S26 Ultra
- Motorola Razr Fold
- ChatGPT
- OPPO Find N6
- Mobiles Under Rs. 40,000
- Vivo X300 Ultra
- Asus Zenbook S14
- iQOO 15
- Vivo X300 Pro
- Lenovo Yoga Slim 7i Aura Edition
- iQOO 15R
- Vivo X Fold 5
- Sony PlayStation 5
- HP OmniPad 12
- OnePlus Nord CE 6 Lite
- OnePlus Pad 4
- OPPO F33 Pro 5G
- Cryptocurrency
- HP OmniBook Ultra 14 (2026)
- iPhone 17
- Eureka Forbes AP 355 Room Air Purifier
- Latest Mobile Phones
- Compare Phones
Latest Gadgets
- Vivo V70 Lite 5G
- Infinix Smart 20
- Lava Bold N2 5G
- Motorola Edge 2026
- Honor X7e
- Huawei Nova 16 Ultra
- Huawei Nova 16 Pro
- Huawei Nova 16z
- Asus ExpertBook B5 Flip G2 (2026)
- Asus TUF 16 (2026)
- Asus Pad
- Poco Pad C1
- Amazfit Balance Ultra
- Amazfit Balance 3
- Sony Bravia 7II
- Lumio Vision 9 (2026)
- Acer Predator Atlas 8
- Asus ROG Ally
- IFB 1.5 Ton 3 Star Inverter Split AC (CI193GN22RGM3)
- IFB 2 Ton 3 Star Inverter Split AC (CI223GD32RGM3)

- About Us
- Sitemaps
- Feedback
- Archives
- Contact Us
- RSS
- Advertise
- Career
- Privacy Policy
- Ethics
- Editorial Policy
- Terms & Conditions
- Complaint Redressal
Download Our Apps
Available in Hindi
© Copyright Red Pixels Ventures Limited 2026. All rights reserved.


