Ever faced a virus attack on your PC? Have an old laptop that refuses to boot up one fine day, throwing up errors such as bootmgr missing or NTLDR missing? Your best option in both these cases may be to reinstall Windows on your computer. When you first use your computer, you're prompted to create a DVD backup of your Windows install, but keeping a DVD safely and not losing it can be a bother. Being able to reinstall Windows using a USB you just keep nearby can be a big help, and to do this all you need to do first is create a bootable Windows USB drive. This is also very helpful if you bought a compact laptop - many smaller new devices don't have a DVD drive.
(Also see: How to Make a Bootable USB Disk for Windows 10)
Remember you'll need a working Windows install (any version) to do this - if your computer won't boot, use a friend's to follow these steps.
Here's everything you need to know about the process.
How to Create a Bootable Windows 7 USB Drive
The first thing you need is a Windows ISO or an image file. This is a virtual copy of a Windows installation DVD and you can source this legally from Microsoft without a product key. Here are the links for various edition of Windows 7.
Windows 7 Ultimate (32 bit)
Windows 7 Ultimate (64 bit)
Windows 7 Professional (32-bit)
Windows 7 Professional (64-bit)
Windows 7 Home Premium (32-bit)
Windows 7 Home Premium (64-bit)
You'll still need a valid product key when you reinstall Windows so make sure you keep that safely.
Once you've downloaded the Windows 7 ISO file, follow these steps to burn it to a pen drive.
-
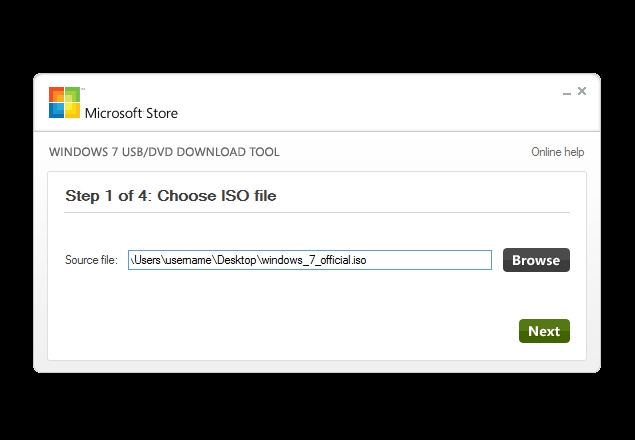
Download the Windows USB/DVD tool from here and run it.
-
Click Browse and select the downloaded Windows 7 ISO file.
-
Click Next.
-
The next page asks whether you want to save this file to a USB or a DVD. Click USB device.
-
Connect a pen drive with at least 4GB space to your computer. Make sure you back up all data on the pen drive to your computer as it will be erased during this process.
-
Select your pen drive from the drop down menu and click Begin copying.
-
When this process is complete, you'll have a bootable Windows 7 USB ready.
How to Create a Bootable Windows 8 USB Drive
-
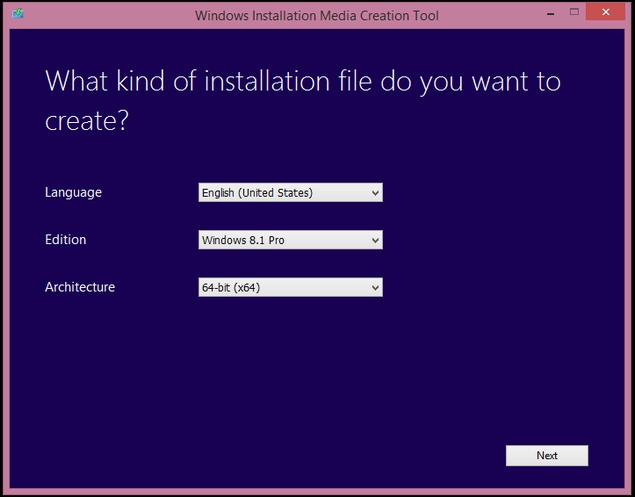
Download the Windows Installation Media Creation Tool from here and run it.
-
Select the Language from the first drop-down menu.
-
Then select the Edition of Windows you want to install. Your choices are: Windows 8.1, Windows 8.1 N, Windows 8.1 Pro, Windows 8.1 Pro N and Windows 8.1 Single Language.
-
In the third drop-down menu next to Architecture choose whether you want a 32-bit or 64-bit version of the OS. If you need to see which version you're running right now, right click on My Computer and select Properties. There, you'll see the information you need under Windows Edition and System type respectively. Alternatively, check Microsoft's website for detailed instructions.
-
Click Next.
-
Plug in a USB drive to your computer. Make sure that it has at least 4GB space. If there's any important data on the drive, create a backup as this process will erase the pen drive completely.
-
Now you'll be asked to choose where to save the ISO file. Choose USB flash drive.
-
Click Next.
-
You'll see a list of USB drives connected to your computer. Select your pen drive from the list and click Next.
-
Now the Media Creation Tool will begin downloading the ISO straight to your pen drive. When the download completes, click Finish.
How to Create a Bootable Windows XP USB Drive
-
Go to the Windows XP SP3 ISO download page.
-
Select the language from the drop-down menu and click the big red Download button.
-
Download a free programme such as ISOtoUSB to burn the image to a pen drive. There are a lot of apps that let you do this and you can use any of these. We found ISOtoUSB easy to use and light, so we picked it over others.
-
Install ISOtoUSB on your computer and open it.
-
Click Browse and select the downloaded Windows XP ISO file.
-
Plug in a pen drive with at least 1GB free space to your computer. All data on this pen drive will be erased so make sure you have a backup.
-
In ISOtoUSB, select the pen drive from the drop-down menu.
-
Click the checkbox next to Bootable
-
Click Burn.
When the process is complete, a bootable Windows XP USB drive will be ready.
Booting and installing Windows from USB Drive
Now you have a bootable pen drive ready, you can boot off this drive and install Windows. Installing Windows is quite straightforward, but the steps leading up to it may vary a little depending on the manufacturer of your computer. We've added a brief explanation below on how to do this.
When you're booting up the computer, on the very first screen, you'll see a text which says something like "Press Del to Enter BIOS". Press whatever key is listed - this is usually Delete, or one of F1, F2, F8, or F12 - when the computer is booting, to enter the BIOS. There, you need to find a menu like Advanced BIOS settings, and select USB as the primary boot device. Now, you need to save and exit BIOS - the key to do so will be listed on-screen, but it is usually F10. Plug in the USB, and when you reboot, you'll start the install process for Windows on your computer. Follow on screen instructions to install Windows 8, Windows 7, or Windows XP.
Did you manage to create a bootable Windows pen drive? Let us know via the comments. For more tutorials, head to our How To section.
Affiliate links may be automatically generated - see our ethics statement for details. 
 Microsoft Introduces Two New Reasoning Agents in 365 Copilot, Launches Autonomous Agents in Copilot Studio27 March 2025
![[Sponsored] 10 Reasons to Buy Samsung Galaxy Book5 Series Laptops](https://c.ndtvimg.com/2025-03/6gg1i738_samsung-laptops_160x120_28_March_25.jpg?downsize=180:*)


![Gadgets 360 With Technical Guruji: Ask TG [ March 22, 2025]](https://c.ndtvimg.com/2024-12/5s52e4k_-ask-tg_640x480_14_December_24.jpg?downsize=180:*)


