-
 How to Watch WWDC 2026 Live on YouTube, Apple TV, and More: iOS 27, New Siri Expected8 June 2026
 -
WWDC 2026 Roundup: From iOS 27 to Revamped Siri, What to Expect from Apple’s Annual Developer Conference6 June 2026
-
New Apple Arcade Games Coming in June 2026: Here's the Full List5 June 2026
-
Apple's MacBook Ultra With OLED Screen Said to Launch Later This Year; Screen Sizes Suggested5 June 2026
-
Apple Rolls Out New App Store Age-Verification Rules for Texas Users Following Court Ruling5 June 2026
- Home
- Apps
- Apps Features
- Buying the iPhone 6? Check How to Completely Erase Your Old iPhone First
Buying the iPhone 6? Check How to Completely Erase Your Old iPhone First
By Pranay Parab | Updated: 12 September 2014 11:58 IST

Click Here to Add Gadgets360 As A Trusted Source

Advertisement
Now that Apple has announced the launch of the iPhone 6 and iPhone 6 Plus, many of you might be looking to upgrade. That means some of you might want to sell your old iPhone, which brings us to the inevitable task of ensuring that your data is securely removed from the device. You don't want to hand strangers access to your data. To avoid all the hassle, here's a guide to help you securely delete all you data from your iPhone.
According to Apple, all iPhones from the iPhone 3GS onwards come with hardware encryption so if someone tries to use data recovery software on your iPhone, your information will still be secure. As per Apple, all you need to to completely delete your data, is use their erase functions. For this to work, you need to have a passcode enabled. To do this, you need to follow these steps:
1. On your iPhone, Go to Settings > Passcode.
2. Tap Turn Passcode On.
3. You'll be asked to enter a passcode, and then re-enter it for verification. That's it, the passcode is enabled.
4. The last line on the page should be "Data protection is enabled."
After that, you can erase all your data. This is what you need to know:
Create a backup
Before wiping your data, make sure that you backup your iPhone to avoid loss of data while changing phones.
- Just go to Settings > iCloud > Storage & Backup.
- Turn on the switch marked iCloud Backup. You'll get a warning telling you that your iPhone will not back up to your computer automatically. Tap okay.
- One iCloud Backup is on, tap Backup Now. This will start backing up your data to iCloud.
- Please note that if you use iCloud Backup, then anything you delete manually will also be removed from the backup. Do not manually remove phone numbers, photos etc. unless you don't want to recover them on your new device.
- In case you don't want to use iCloud or if your Internet has low upload speeds, you can also backup your data using iTunes. First, connect your iPhone to the computer. iTunes also backs up all the apps you downloaded and the data in those apps. iCloud offers up to 5GB of free space and beyond that you will have to pay. So if you have a lot of data on your iPhone, an iTunes backup is the best because it is free and doesn't need Internet.
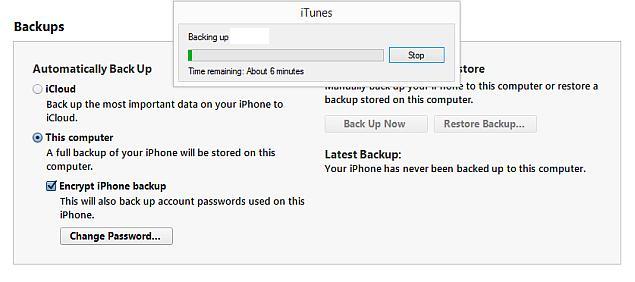
- Open iTunes. Click iPhone on the top-right, next to iTunes.
- Under Automatically Back Up, check Encrypt iPhone backup. Now set a password for your iTunes backup. We recommend that you do this because your iPhone backup might contain sensitive data such as passwords and personal content that you may not want others to see. If you enable this option, you will have to enter a password if you want to restore the backup from iTunes. This keeps your data from being accessed without authorisation.
- Under Manually Back Up and Restore, click Back Up Now to start backing up your iPhone. This process takes some time especially if it's the first time you are backing up data. Make sure you have time to spare before you do this. It took us a little over 40 minutes to take a backup the first time.
- Once essential data from the default apps has been backed up, iTunes will ask you if you want to transfer purchases. This basically takes a backup of all the apps installed on your phone, along with data downloaded within those apps. To do this, you will have to sign in with your Apple ID. We took a backup of 97 apps this way and after restoring, only almost all apps had retained a copy of data saved. One podcast app couldn't save downloaded podcasts and the email apps required re-authentication. That apart, the backup saved everything, including unread notifications.
If the iPhone is with you
Once you have taken a backup, you are ready to delete your data.
- Go to Settings > General > Reset.
- On this page, you'll see options to reset various saved data. To delete everything, tap Erase All Content and Settings.
- You will be prompted to enter your passcode. If your phone has a Restrictions passcode, which is used to block certain websites and content, you will have to enter that code too.
- After this, you will see warnings telling you that this will delete all media and data. Tap the Erase button both times.
- Following this, you will have to enter your Apple ID password. This step only applies if you have enabled the Find My iPhone service. It's an effective anti-theft measure. After you provide your password, your iPhone will be erased and the next owner can activate the phone using his or her Apple ID.
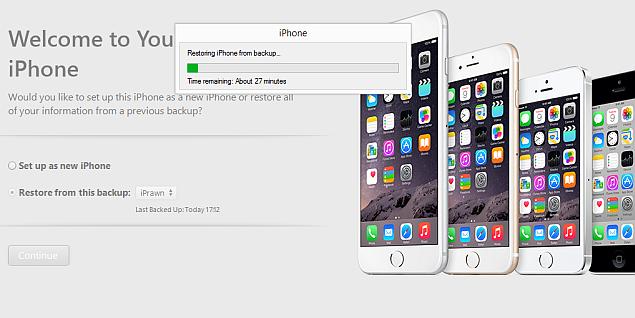
- After you get a new iPhone, you can quickly restore your backup by choosing Restore from iCloud Backup or Restore from iTunes Backup instead of Set Up as New iPhone.
If the iPhone is not with you
In case you lose your phone and want to wipe it to keep your data safe, you can use the Find My iPhone service. This is free, and you should ideally always activate it.
- The first step is making sure the service is on your device now. On your iPhone, go to Settings > iCloud.
- Slide the switch to turn on Find my iPad, and it is on.
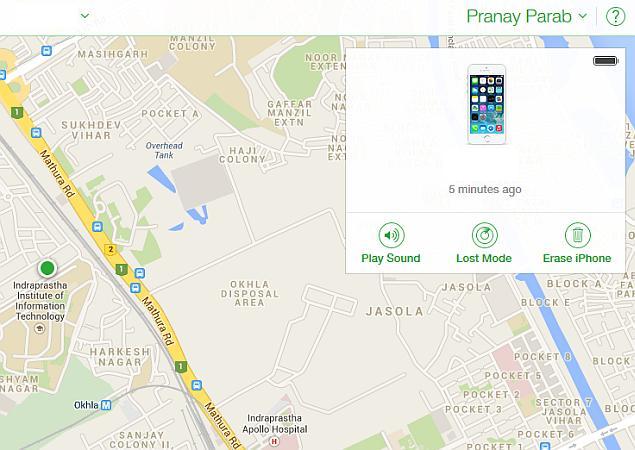
- This can be useful in case you lose your phone, or sell it without remembering to wipe all the data. Assuming you had enabled this service, deleting everything is simple. First, log in to iCloud using your Apple ID.
- Click All Devices at the top and select your iPhone from the list of devices.
- Select Erase iPhone from the box that pops up on the top-right > click Erase in the next popup.
- After you've clicked on Erase, a new button pops up, labeled Remove from Account. Click this, to de-link that phone from your account and prevent the next owner from accessing your data.
- In case you sold your iPhone without deleting your data and Find My iPhone isn't enabled on your phone, then the best you can do is change the password of your Apple ID. This won't stop the next owner from accessing data already stored on the device, but it will make sure that they can't delete data from your iCloud account. Here's how to change your Apple ID password.
- Visit the Apple website. Enter your Apple ID and click Next.
- Now you can choose between email authentication or answering security questions to change your password. Choose the method you prefer, and click next.
- You'll be asked to verify your birth date before proceeding. Fill in the details, and click next.
- Answer the security questions and click Next, or follow the link that is sent to your registered email addresses.
- Now you can enter your new Apple ID password, enter it again and click Reset Password.
You don't have to worry about data theft once you've wiped your iPhone. Apple uses hardware encryption on every iPhone, which ensures that even if someone tried to recover data from your iPhone, they wouldn't be able to do so.
We hope you found this tutorial useful. For more such tutorials, visit our How to section.
Comments
Get your daily dose of tech news, reviews, and insights, in under 80 characters on Gadgets 360 Turbo. Connect with fellow tech lovers on our Forum. Follow us on X, Facebook, WhatsApp, Threads and Google News for instant updates. Catch all the action on our YouTube channel.
Related Stories


Advertisement
Follow Us
-

19:39
LIVE: Xiaomi 17T & Xiaomi TV FX Mini LED Series Launch | Get Closer to Every Detail -
04:26
Moto Buds 2 Review: Best TWS Under Rs. 3000? -
03:26
How To Apply For Driving Licence Online From Home? | Step-by-Step Guide 2026 -
05:58
Motorola Edge 70 Pro Review | Full Specs, Performance & Battery Test -
07:07
Moto g37 Power Review: Best Phone To Buy Under 25,000?
-
Instagram Plus: अब बिना Seen हुए देख सकेंगे Story, मिलेंगे कई नए फीचर्स
-
OnePlus Community Sale: स्मार्टफोन, टैबलेट और ईयरफोन्स पर भारी डिस्काउंट!
-
Xiaomi 17T vs Vivo X300 FE vs OnePlus 15: कौन बेहतर?
-
7000 से ज्यादा सस्ता मिल रहा Vivo का तीन 50 मेगापिक्सल कैमरा वाला फ्लैगशिप फोन
-
Amazon Mega Deal Days: स्मार्टफोन, लैपटॉप और टीवी पर मिल रहा गजब का डिस्काउंट
Advertisement
Popular on Gadgets
- Samsung Galaxy S26 Ultra
- Motorola Razr Fold
- ChatGPT
- OPPO Find N6
- Mobiles Under Rs. 40,000
- Vivo X300 Ultra
- Asus Zenbook S14
- iQOO 15
- Vivo X300 Pro
- Lenovo Yoga Slim 7i Aura Edition
- iQOO 15R
- Vivo X Fold 5
- Sony PlayStation 5
- HP OmniPad 12
- OnePlus Nord CE 6 Lite
- OnePlus Pad 4
- OPPO F33 Pro 5G
- Cryptocurrency
- HP OmniBook Ultra 14 (2026)
- iPhone 17
- Eureka Forbes AP 355 Room Air Purifier
- Latest Mobile Phones
- Compare Phones
Latest Gadgets
- Lava Bold N2 5G
- Motorola Edge 2026
- Honor X7e
- Huawei Nova 16 Ultra
- Huawei Nova 16 Pro
- Huawei Nova 16z
- Huawei Nova 16
- Itel Aqua
- Asus ExpertBook B5 Flip G2 (2026)
- Asus TUF 16 (2026)
- Asus Pad
- Poco Pad C1
- Amazfit Balance Ultra
- Amazfit Balance 3
- Sony Bravia 7II
- Lumio Vision 9 (2026)
- Acer Predator Atlas 8
- Asus ROG Ally
- IFB 1.5 Ton 3 Star Inverter Split AC (CI193GN22RGM3)
- IFB 2 Ton 3 Star Inverter Split AC (CI223GD32RGM3)

- About Us
- Sitemaps
- Feedback
- Archives
- Contact Us
- RSS
- Advertise
- Career
- Privacy Policy
- Ethics
- Editorial Policy
- Terms & Conditions
- Complaint Redressal
Download Our Apps
Available in Hindi
© Copyright Red Pixels Ventures Limited 2026. All rights reserved.


